作者:陈广 日期:2019-3-29
通过本实验,掌握 ISO15693 电子标签的写卡操作。
只有先往标签里写入数据,才能读出来,所以这里先介绍写卡操作。
新建一个控制台应用程序,输入如下代码:
using HBLib;
using HBLib.HR8002Reader;
using HBLib.ISO15693;
using System;
using System.Threading.Tasks;

namespace I15693CmdDemo
{
    class Program
    {
        static ComPort com = new ComPort("COM3", 19200, 3000);
        static Reader reader;
        static I15693 i15693;

        static void Main(string[] args)
        {
            com.Open();
            reader = new Reader(0x00, com);
            i15693 = new I15693(0x00, com);
            WriteSingleBlock();

            Console.ReadLine();
        }

        private static async Task WriteSingleBlock()
        {
            await reader.ChangeToISO15693Async();
            var info = await i15693.InventoryWithoutAFIAsync();
            if(info.ReturnValue!=ReturnMessage.Success)
            {
                Console.WriteLine("选卡失败!");
                return;
            }
            byte[] data = { 0x0A, 0x0B, 0x0C, 0x0D };
            //写数据块0,第一个参数表示写的是 B 类标签;第二个参数表示标签块长度为 4;第三个参数为标签UID;
            //第四个参数表示要写入数据的块号;第五个参数表示要 写入的数据。
            var info1 = await i15693.WriteSingleBlockAsync(I15693CardType.TypeB, I15693BlockLen.Four, info.UID, 0, data);
            if (info1.ReturnValue ==ReturnMessage.Success)
            {
                Console.WriteLine("成功写入数据!");
            }
            else
            {
                Console.WriteLine(info1.GetStatusStr());
            }
        }
    }
}
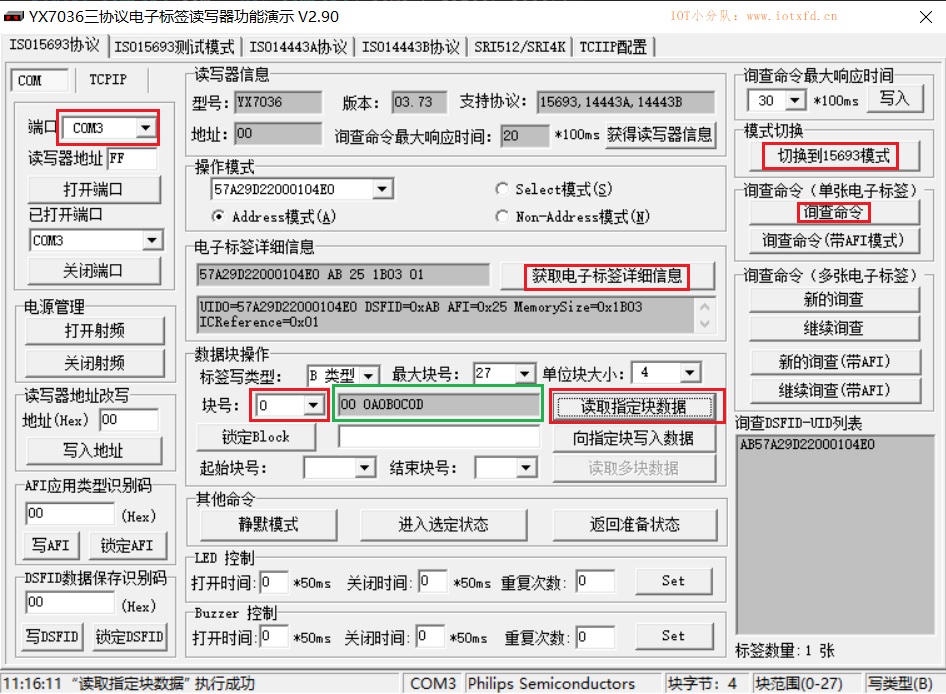
运行程序,如果显示成功写入数据!,则说明写入成功。现在只能拿读写器厂家的 Demo 来验证标签是否已经写入的数据。打开 YX7036DemoCN.exe 文件,选择COM3端口,依次单击按钮:【打开端口】、【切换到15693模式】、【询查命令】、【获取电子标签详细信息】。选择【块号】0,然后单击【读取指定块数据】按钮,最终结果如下所示:
15693 标签的数据块长度为 4 个字节,只够存一个整数。如果需要写入文字性内容或复杂对象,就需要跨数据块写数据了。而 HR8002 读写器并没有现成的写多个数据块的方法,所以只能在上位机多次调用写入了。而我手上的标签只给用户留了 27 个块,共 27*4=108 个字节,要存入复杂对象是有点捉襟见肘了。之前讲 ISO14443 的时候已经讲解了如何存取复杂对象,这一次我们就只写入一个字符串。
由于 15693 标签中的块是可以被锁定的,所以在写入数据前,为了程序的健壮性,需要判断写入的数据块是否有被锁定的。另外,还需要在字符串转化的字节数组中的第一个字节写入字节数组长度,以方便读取时操作。
将上述代码更改如下:
using HBLib;
using HBLib.HR8002Reader;
using HBLib.ISO15693;
using System;
using System.Text;
using System.Threading.Tasks;
namespace I15693CmdDemo
{
class Program
{
static ComPort com = new ComPort("COM3", 19200, 3000);
static Reader reader;
static I15693 i15693;
static void Main(string[] args)
{
com.Open();
reader = new Reader(0x00, com);
i15693 = new I15693(0x00, com);
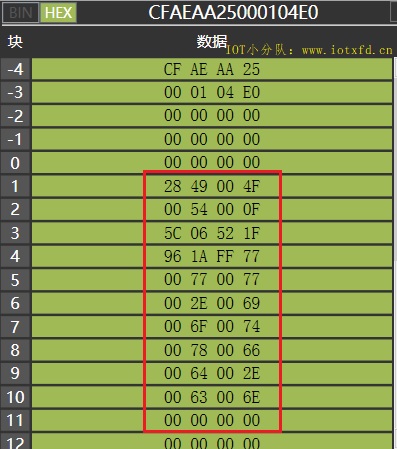
WriteUnicodeString("IOT小分队:www.iotxfd.cn", 1);
Console.ReadLine();
}
private static async Task WriteUnicodeString(string str, byte begin)
{
await reader.ChangeToISO15693Async();
var info = await i15693.InventoryWithoutAFIAsync();
if (info.ReturnValue != ReturnMessage.Success)
{
Console.WriteLine("选卡失败!");
return;
}
await i15693.SelectAsync(info.UID); //让询查到的标签进入选中状态
byte[] temp = Encoding.Unicode.GetBytes(str);
//首先判断是否有足够的空间存储数据
if ((temp.Length + 1) / 4 > 27 - begin)
{
Console.WriteLine("空间不足,请减少输入字符!");
}
//接下来判断将要被写入数据的块是否有被锁定的
for (int i = begin; i <= begin + (temp.Length + 1) / 4; i++)
{
var info1 = await i15693.ReadSingleBlockAsync(I15693BlockLen.Four, (byte)i);
if (info1.BlockSecurityStatus == 1)
{
Console.WriteLine("在将要写入数据的块中,存在被锁定的块,写入失败!");
return;
}
}
//写入数据
byte[] data = new byte[temp.Length + 1];
data[0] = (byte)temp.Length; //压入数据长度
temp.CopyTo(data, 1);
int index = 0;
while (index < data.Length)
{
byte[] blockData = new byte[4];
//防止最后剩下的字节不足4位
int len = data.Length - index < 4 ? data.Length - index : 4;
Array.Copy(data, index, blockData, 0, len);
index += len;
var info2 = await i15693.WriteSingleBlockAsync(I15693CardType.TypeB, I15693BlockLen.Four, (byte)begin, blockData);
begin++;
if (info2.ReturnValue != ReturnMessage.Success)
{
Console.WriteLine("写入数据失败:" + info2.GetStatusStr());
return;
}
}
Console.WriteLine("成功写入数据");
}
}
}
运行程序,将数据写入标签。如果使用模拟器,可以看到数据已写入标签,如下图所示。要验证实卡里的数据,我们将在下一个实验里进行数据的读取以验证数据是否完整写入。